Monday, August 15, 2016

Breezy Net Repeating Lace Pattern

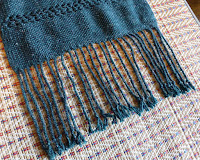
Recently I knew I wanted to make a stole out of a lace weight yarn (in this case, Artyarns' Silk Mohair Glitter in color H12). I wanted a really simple, open lace pattern with lots of space between the threads, almost like a fisherman's net. But I couldn't find a lace pattern that was open enough without being way too overwrought for me. So I made up my own pattern.

Breezy Net Lace
When repeated, this pattern does not increase or decrease stitches, so it is good for a square object such as a scarf.

This pattern is a multiple of 6 stitches plus 4; the plus-4 is for two garter stitches at the edges of the piece, but you could of course have as many or as few garter stitches as you wanted. It is a four-row repeat.

Breezy Net Repeating Lace Pattern
Start by casting on as many stitches as you need for the width of your piece size as if you were knitting it in garter stitch.

This version of the pattern includes two garter stitches on either edge of the piece.

1st round:  K2, *yo, k3tog, yo, k3, repeat from * to last 2 sts, k2.

2nd round:  K2, k2, k2tog, yo, k1, yo, *k2tog, k1, k2tog, yo, k1, yo, repeat from * to last 9 sts, k2tog, k1, k2tog, yo, k2, k2.

3rd round:  K2, *k3, yo, k3tog, yo, repeat to last 2 sts, k2.

4th round:  K2, k2, yo, *k2tog, k1, k2tog, yo, k1, yo, repeat to last 6 sts, k2tog, k2, k2.

The stole, partially stretched to show
lace pattern.
The pattern from a little farther away.

Monday, July 11, 2016

Victor Op-Art Socks

Dimensions: Fits men's U.S. shoe sizes 9-10
Completed: January 2016
Vega-Nor by Victor Vasarely (1969)

I made these socks using the pattern called "Victor" in Op-Art Socks by Stephanie van der Linden. (This is the same book I used to make the Symmetry socks in 2015.) These socks are based on the art of Victor Vasarely, who liked to use optical illusions in his artwork.

As with the Symmetry socks, I substituted Lorna's Laces Shepherd Sock hand-dyed yarn for the pattern's original Zitron Trekking Sport 4-ply yarn. I used 2 skeins each of #511 Buckingham Fountain for the variegated khaki, and #4ns Blackberry for the purple. I knitted these on a US #1 needle.

To avoid the problem I ran into with the Symmetry socks, where one of them ended up slightly larger than the other, I knitted these socks simultaneously on a 36" circular needle.

This pattern involved a lot of complex chart-following two-color knitting. And I'm not that skilled when it comes to keeping my gauge correct in two-color knitting; I tend to make it far too tight. I tried to remain loose with these socks, and to catch my floats using this method whenever I had done three stitches of the same color. The socks still came out a little tighter than I had planned, but they are wearable.


They look great from the top...


...and the heel is cool, too.
Socks at rest.

Monday, June 13, 2016

Karen Q's Uluru Scarf

Dimensions: 6' by 8" wide (with 3" fringe on each end)
Completed: November 2014

The warp is one skein of Knitting Fever Uluru (cotton, acrylic, polyester) in color #11 Ammonite. The weft is one pick of the Uluru alternating with two picks of Classic Elite Vail (baby alpaca and bamboo viscose) in color #6436 Sand. I only needed one skein each of the Uluru and the Vail. The Vail gave the scarf have a really nice soft texture.

Scarf on the loom
I originally started by using only the Vail for the weft, but it was just making the scarf come out looking too white. So I ripped out the two inches or so I had already done, and started over again alternating two picks of the Vail with one pick of the Uluru. I think it turned out to be a very nice subtle effect for the color.

This is all done in plain weave -- nothing fancy, like the two tweed scarves I made earlier in 2014. I guess I needed a break!


Monday, May 16, 2016

Luigi's Locks Grass-Green Bouclé Scarf

Dimensions: 8" wide by 72" long, plus 4" fringe at each end
Completed: February 2016
The raw material

I wove this scarf in a straightforward plain weave on my rigid heddle loom. I didn't think it was worth trying to do anything fancy with the weave because I thought the bouclé structure of the yarn would probably obliterate any pattern I attempted. And, more importantly, the yarn was so beautiful I really wanted it to be the focus here, not the weave.
 
The warp and weft are both done in the same yarn: a hand-dyed grass-green bouclé mohair yarn called "Luigi's Locks" from Yellow Dog Farm, which I bought at the Vermont Sheep and Woolcraft Fair last summer. The yarn has little streaks of darker green and lighter yellow-green throughout.

A sample I wove on a piece
of cardboard to see if the 7.5 epi
gauge would look all right
Luigi's Locks
on the loom


This scarf probably used about 400-425 yards of wool; I had two skeins of 225 yards each, and I ended up using roughly one and two-thirds of the skeins.

When I measured its gauge, it looked like Luigi's Locks was roughly a worsted weight  I used a 7.5 dent reed and tried to keep to roughly 7.5 ppi so that it could be a pretty loose, open weave; I did this both so the fabric wouldn't be so stiff, and also so there would be plenty of room for the little bouclé loops to poke out in all directions. I warped the loom with 62 ends of 8.5 yards each.

The scarf was about 8.25" wide on the loom, and about 8" off the loom. I wove the scarf out to about 74" long, which only ended up shrinking a tiny bit to about 72" long off the loom; maybe the bouclé loops helped it keep its size off the loom. I left 4" of fringe on both ends, which I tied off in groups of four warps each.

The final product (although this is
not what the color really looks like)
Close-up of the finished fabric


Monday, April 11, 2016

Krokbragd Sampler Coasters

Dimensions: Three coasters each 4.25" wide by 4.25" long (plus 0.25" fringe on each end)
Completed: January 2016

I was leafing through The Weaver's Idea Book by Jane Patrick one day, and came upon a section on Norwegian krokbragd. It was intriguing: krokbragd is a weft-faced weave, and I had never done a weft-faced weave before. And it is also a twill weave. The combination seemed like a mind-stretching challenge for my rigid heddle loom (my only loom).

I warped with 8/5 cotton rug warp, 37 ends 5' long. I used two 7.5 dent heddles and set them up for the three-pick-repeat twill weave, which is two-up-one-down for the first two picks and then plain weave for the third pick.

For the colors that made up the patterns, I decided to use the five little balls of sampler yarns I had bought at the Vermont Sheep & Woolcraft Fair from the proprietress of Tidal Yarn. She gets her yarn from small New England sheep farms and dyes much of it using plants she grows in her own garden. I knew that I would quickly run out of yarn if I didn't have a larger amount for my background color, so I also bought one skein of JaggerSpun Heather 3/8 sport weight yarn in Sagebrush to use for that.

I chose colors and designs on the fly as they appealed to me, weaving 9 picks (or a total of 3 krokbragd rows) between each design. I ended up trying out almost all of the patterns in Patrick's book (except for the guitars), and then I invented a few of my own--some of which were successful, and some not so much. These were my two most successful designs:


I wove 7 picks of plain weave with the carpet warp at the top and bottom of each coaster, and left about 3" of space between each one so I could give them a fringe. Each coaster ended up being about 4.25" square on the loom, and about 4" square after I took them off the loom (not including the carpet warp edges).

Krokbragd results in really beautiful geometric patterns. The frustrating thing about it (which Patrick does warn you about) is that because of the twill structure plus the weft-faced nature of the style, it takes three picks to actually make one row of weave. This means it progresses really, really slowly. I had planned to make four coasters, but by the time I had gotten through my third, I was wiped out.

I have seen loads of impressive krokbragd rugs and wall hangings on the internet, and I have to say I don't know how the people who made them have the patience. Maybe it would be different if I had the correct loom for this type of weave.

Monday, March 14, 2016

Leno & Brooks Bouquet Scarf in Serenity Glitter Sock Yarn

Dimensions: 8" wide by 63" long, plus 3" of fringe on both ends
Completed: November 2015
 
This summer I made my first-ever in-person trip to the Webs yarn store in Northampton, MA, where I bought two skeins of Zen Yarn Garden's superwash merino Serenity Glitter Sock yarn in Midnight Teal. It is a beautiful dark, dark blue-green color with little bits of silver glitter spun into it.
 
Working the pick for a row of leno
I've read a number of blog posts recently that urged me to try making a woven scarf out of sock yarn, and I'd been meaning to learn how to do some hand-picked openwork weaving on my rigid-heddle loom, so I thought the combination might be perfect for this yarn.
 
I warped my loom with 104 ends 90" long (leaving about 18" for loom waste). I set it up for plain weave using a 10 dent heddle. It was about 10 1/2" wide in the loom, but it shrank down to about 8" when I took it off the loom.
 
Once the loom was set up, I wove using this pattern:
 
- 36 picks of plain weave
- 1 row of 2:2 leno with an open shed, starting by twisting two warps over two warps
- 1 row of 2:2 leno with an open shed, starting by twisting one warp over one warp
- 20 picks of plain weave
- 1 row of Brooks bouquet where each bouquet went over four warp ends
- 20 picks of plain weave
- 1 row of 2:2 leno with an open shed, starting by twisting one warp over one warp
- 1 row of 2:2 leno with an open shed, starting by twisting two warps over two warps

I repeated that pattern 9 times, until the scarf was about 63" long, and then did 36 more picks of plain weave, and cut it off the loom.
Two rows of leno bookending
a row of Brooks bouquet

The leno and the Brooks bouquet were both really fun to do, and a lot easier to learn than I thought. I got the leno instructions from Jane Patrick's The Weaver's Idea Book. Her instructions on Brooks bouquet were a little unclearish, I thought, so I watched a couple YouTube videos demonstrating it until I felt I had gotten the idea.
I alternated how I started my leno rows because I liked the way the leno looked when the little openwork spaces were staggered from row to row better than when the spaces line up vertically.

After I had cut it off the loom, because I hadn't used enough new techniques in this scarf already, I guess, I decided to give it a twisted fringe. I'd seen twisted fringe used in several patterns in Handwoven recently, and thought it might be good in this context. I used this video by Scott Rohr to learn how to do it.

(Frustrating) twisted fringe
The twisted fringe took me forever to finish. Maybe I'm really slow twister, but it took me several hours to do all 52 separate pieces of fringe. I also don't really like the way it looks; it's spaced too far apart and it looks too controlled, too confined. I think I'm going to go back to the fluffy, organic lark's head fringe from now on!

I also think the yarn I used is a little stiff to make a really soft and comfortable scarf. It might help to use a slightly larger sett, so that the plain weave isn't quite so dense.


Everybody likes Brooks Bouquet!


The finished product


Monday, February 15, 2016

Sally's Peaceful Harbor Placemats

Dimensions: Four placemats about 12" high by 18" wide
Completed: October 2015
9-foot warp ends look very long

I made these placemats using the Peaceful Harbor Placemats pattern from Halcyon Yarn.

They wove up pretty quickly, partly because the yarns are fairly large gauge and also because the alternating between the three different colors kept it from getting too routine.

The toughest part was keeping the three shuttles in order with every pick, and not twisted around each other incorrectly, so that the selvedges looked consistent and clean.

I chose one of the recommended color combinations on Halcyon's website. These are the colors I used (which I think will go best with the color scheme in the intended recipient's kitchen):

3/2 Pearl Cotton yarn in Deep Turquoise
Cascade Luna Paints in Color #9930 (a slightly variegated turquoise)
Cascade Ultra Pima in Color #7730 (a medium purple)

These placemats are pretty easy even for a relatively infrequent sewer to finish, because you only have to fold over and then sew up the left and right edges; the selvedges, which end up as the tops and bottoms of the placemats, are good enough that you can leave them without finishing.


Placemat #3 ending,
moving into placemat #4
 
Close-up on the weaving,
still on the loom
 
The finished placemats  

Monday, January 18, 2016

Loupe Neck Band

Dimensions: 5/8" wide by 17" long (including snap hook at end)
Completed: October 2015

I made this neckband as a present for an avid mineral collector, who loves to wander through the wilderness looking at specimens through a portable field loupe. The band ends in a snap hook to which he can attach the loupe.

I picture mineral collectors far and wide being jealous of the dashing figure he presents in the field with his custom-made strap, bedecked with the tools of his trade.
 
In general, it worked out pretty well. I ran into serious tension and tangling problems, which I solved by creating home-made weights for my warp threads (described in this earlier post). And the final assemblage was a little dicey, since I'm apparently not nearly as good at working my sewing machine as I am the loom. But I feel pretty proud of it, overall.

The Pattern
Cards set up on the loom
 
I used 10/2 pearl cotton yarn from Halcyon Yarns. The main color is Ruby (#1220) and the foreground designs are in Pistachio (#1880).

The pattern uses 22 four-hole cards. The 20 middle cards are for the design itself, while the outside-most two cards (cards 1 and 22) are for the selvedges.

The selvedges are done by constantly turning the cards forward one turn with each pick, no matter what is happening with the cards in the design section of the strap.
 
It's a pleasure to see your design
come into existence
I warped the loom with 88 warp ends 70" long. I figured that would result in a 52" strap plus 18" of loom waste, and that would give me plenty for me to experiment with and still end up with a band that was a total of 34" in diameter.
 
The warp ends for the outside selvedge cards 1 and 22 were all Ruby; all the other cards were warped so that holes A and B had Ruby threads in them and holes C and D had Pistachio threads.

I created the designs for the rock hammer, the shovel, and the wearer's initials myself using Guntram's Tablet Weaving Thingy. (I will forever thank you, Guntram, for creating your Thingy.) I designed each element separately and then combined them together into one template, making sure that there were the proper number of spaces between each design element so that the edges of the shovels and hammers weren't offset by one space got kinky.

My final design; click to enlarge
In some cases I couldn't get the elements to be spaced out evenly and not have them be offset by one or three spaces so the twining was wrong and the edges got kinky. So I borrowed one of Guntram's fancy knot patterns (interlace1.gtt) and interspersed it among my hammers and shovels to make the spacing work better. 

Blocking the strap
After that, it was just a matter of finishing up the weaving itself, blocking the strap, and then attaching the snap hook.

I used a 5/8" snap hook (or, to be specific, a "Metal Silvery 0.65" Inside Diameter D-ring Lobster Clasp Claw Swivel Eye Lobster Snap Clasp Hook for Strap."

Due to some mistakes in the execution of my original plan for attaching the snap hook, I ended up cutting the strap into two pieces, one about 4" long and the other about 30" long. I fed the hook through the shorter piece, and then sewed the two pieces together, end to end, with a lot of purple thread and using the buttonhole setting, so that the cut edges of my weaving wouldn't fray. 
 
The finished product

Close-up on the adequately-finished
snap-hook end